Headlight Restoration: Bringing Back the Shine
Restore the clarity of your headlights with our guide to restoration. We cover cleaning and polishing techniques to remove haze and yellowing. Improve visibility and safety with restored headlights.
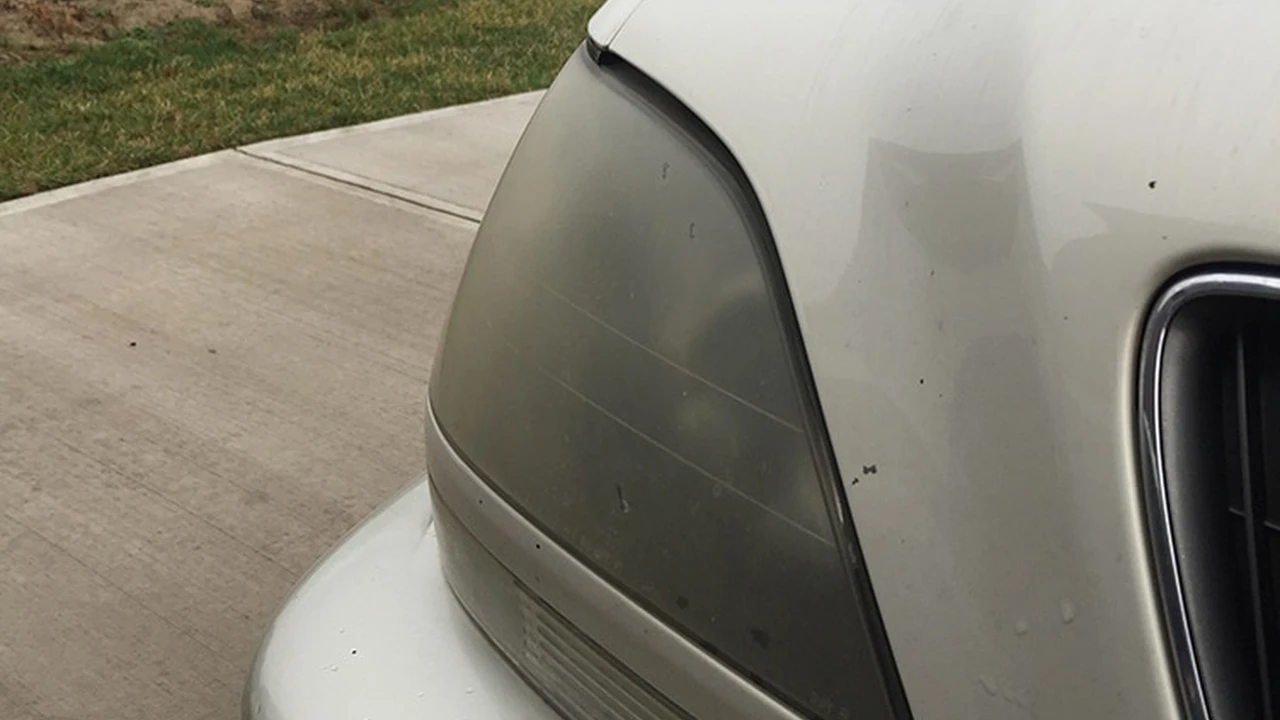
Okay, so your headlights are looking a little… cloudy? Maybe even downright yellow? You're not alone! Headlight haze is a super common problem, especially on older cars. But don't worry, you don't necessarily need to shell out big bucks for new headlights. Headlight restoration can bring back that new-car shine and, more importantly, drastically improve your nighttime visibility. Let's dive into why this happens, how to fix it, and which products can help you see clearly again.
Why Do Headlights Get Hazy Headlight Oxidation Explained
The main culprit behind hazy headlights is oxidation. Most modern headlights are made of polycarbonate plastic, which is strong and durable. However, this plastic is susceptible to UV radiation from the sun. Over time, the UV rays break down the outer layer of the plastic, causing it to become cloudy and yellowed. Think of it like sunburn for your headlights! This oxidation reduces the amount of light that can pass through the lens, making it harder to see at night. Other factors that contribute to headlight haze include:
- Road debris: Sand, rocks, and other debris can scratch the surface of the headlights.
- Chemical exposure: Car washes and some cleaning products can damage the plastic over time.
- Environmental pollutants: Acid rain and other pollutants can accelerate the oxidation process.
DIY Headlight Restoration Methods The Best Techniques
There are a few different ways to restore your headlights yourself. Here are some of the most popular methods:
Sanding and Polishing Headlight Restoration
This is generally considered the most effective method for removing heavy oxidation. It involves sanding down the damaged outer layer of plastic and then polishing the surface to restore its clarity. Here's a basic overview of the process:
- Clean the headlights: Wash the headlights with soap and water and dry them thoroughly.
- Tape off the surrounding area: Use painter's tape to protect the paint around the headlights.
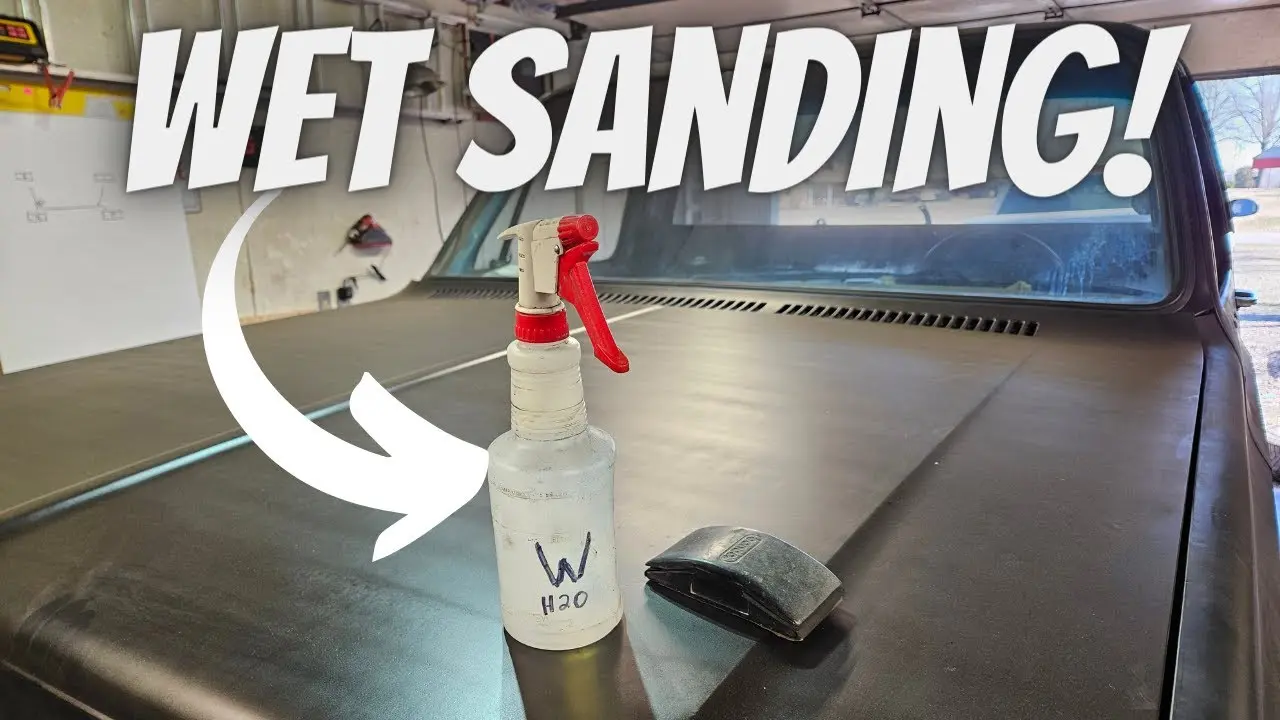
- Sand the headlights: Start with a coarse-grit sandpaper (e.g., 400-grit) and gradually move to finer grits (e.g., 800-grit, 1000-grit, 2000-grit, 3000-grit). Wet-sand the headlights, keeping the sandpaper and lens wet. Use even pressure and overlapping strokes.
- Polish the headlights: Apply a headlight polishing compound to a polishing pad and use a drill or rotary tool to polish the headlights.
- Protect the headlights: Apply a UV protectant sealant to prevent future oxidation.
Headlight Restoration Kits The Easy Solution
Headlight restoration kits are a convenient way to restore your headlights. These kits typically include sandpaper, polishing compound, polishing pads, and UV protectant. They often come with detailed instructions, making the process easier for beginners. We will recommend some kits later.
Using Household Items For Headlight Cleaning
While not as effective as sanding and polishing, some household items can help improve the appearance of slightly hazy headlights. These methods are best for minor oxidation and may not provide long-lasting results. Some popular household remedies include:
- Baking soda and vinegar: Make a paste of baking soda and vinegar and apply it to the headlights. Scrub gently and rinse thoroughly.
- Toothpaste: Apply toothpaste to the headlights and scrub gently with a soft cloth. Rinse thoroughly.
- Bug spray: Spray bug spray onto a cloth and wipe the headlights. Be careful not to get bug spray on the paint. Rinse thoroughly.
Product Recommendations Best Headlight Restoration Kits and Compounds
Okay, let's get down to the nitty-gritty. Here are a few specific product recommendations to help you get those headlights sparkling again. Keep in mind that prices can vary depending on the retailer and any ongoing sales.
Meguiar's Heavy Duty Headlight Restoration Kit
Price: Around $25 - $30
What it is: A complete kit that includes everything you need for sanding, polishing, and protecting your headlights. It comes with multiple grades of sandpaper, polishing compound, a polishing pad, and a sealant. Great for moderate to severe oxidation.
Why we like it: Meguiar's is a trusted brand in car care, and this kit delivers excellent results. The included drill-mounted polishing pad makes the process much faster and easier. The UV sealant provides long-lasting protection.
Where to use it: Perfect for DIYers looking for a comprehensive solution for heavily oxidized headlights. Use it in your garage or driveway.
3M Headlight Restoration Kit
Price: Around $20 - $25
What it is: Another popular kit that includes sanding discs, polishing compound, and a polishing pad. Similar to the Meguiar's kit, but often slightly less expensive.
Why we like it: 3M is known for its high-quality abrasives, and this kit is no exception. The sanding discs are durable and effective at removing oxidation. Easy to use, even for beginners.
Where to use it: A great all-around kit for restoring headlights with moderate oxidation. Ideal for use in your garage or driveway.
Chemical Guys Headlight Restorer and Protectant
Price: Around $15 - $20
What it is: A single-step polishing compound that claims to restore and protect headlights without sanding. Best for light oxidation or as a maintenance product after a more intensive restoration.
Why we like it: If your headlights only have minor haze, this product might be all you need. It's easy to apply and provides a good level of protection. A quicker alternative to sanding and polishing.
Where to use it: Ideal for maintaining previously restored headlights or for addressing very light oxidation. Can be used anywhere, even in direct sunlight (though it's always better to work in the shade).
Cerakote Ceramic Headlight Restoration Kit
Price: Around $20 - $25
What it is: A kit that uses a ceramic coating for long-lasting UV protection. It includes sanding discs, a cleaning solution, and the ceramic coating.
Why we like it: The ceramic coating provides superior UV protection compared to traditional sealants, helping to prevent future oxidation. A good choice for those who want a long-term solution.
Where to use it: Best for headlights that have been recently restored and need maximum protection. Use in a well-ventilated area.
Headlight Restoration Kit Comparison Which One to Choose
Choosing the right headlight restoration kit depends on the severity of the oxidation and your budget. Here's a quick comparison:
- For heavy oxidation: Meguiar's Heavy Duty Headlight Restoration Kit or 3M Headlight Restoration Kit are your best bets. These kits include everything you need for sanding, polishing, and protecting your headlights.
- For light oxidation: Chemical Guys Headlight Restorer and Protectant might be sufficient. This product is easy to apply and provides a good level of protection.
- For long-lasting protection: Cerakote Ceramic Headlight Restoration Kit is a good choice. The ceramic coating provides superior UV protection compared to traditional sealants.
- Budget-friendly option: The 3M kit is typically slightly less expensive than the Meguiar's kit.
Step-by-Step Guide Sanding and Polishing Headlights
Let's walk through the sanding and polishing method in a bit more detail. This is the most common, and often the most effective, way to get your headlights looking like new.
- Gather your supplies: You'll need sandpaper (various grits, typically 400, 800, 1000, 2000, and 3000), a sanding block, water spray bottle, masking tape, headlight polishing compound, polishing pads (foam or microfiber), a drill or rotary tool (optional but recommended), and a UV protectant.
- Clean the headlights: Wash the headlights thoroughly with soap and water to remove any dirt and grime. Dry completely.
- Tape off the area: Use masking tape to protect the paint around the headlights. This is crucial to prevent accidental damage during sanding.
- Wet sanding (Stage 1): Start with the 400-grit sandpaper. Soak the sandpaper and the headlight lens with water. Use the sanding block and apply even pressure, sanding in overlapping horizontal strokes. Don't press too hard. The goal is to remove the heavy oxidation. Repeat this process for a few minutes. The lens will look very scratched and cloudy at this point – don't panic!
- Wet sanding (Stages 2-5): Repeat the sanding process with the 800, 1000, 2000, and 3000-grit sandpaper, respectively. Remember to soak the sandpaper and lens with water before each stage. With each progressively finer grit, you'll be removing the scratches left by the previous grit. The lens should start to look clearer as you move to the finer grits.
- Polishing: Apply a small amount of headlight polishing compound to a polishing pad. If using a drill or rotary tool, set it to a low speed. Polish the headlights using overlapping strokes, applying moderate pressure. The polishing compound will remove the fine scratches left by the sanding process and restore the clarity of the lens.
- Cleaning: Wipe off any remaining polishing compound with a clean microfiber cloth.
- UV Protection: Apply a UV protectant sealant to the headlights. This will help prevent future oxidation and keep your headlights looking clear for longer. Follow the instructions on the sealant product.
Professional Headlight Restoration When to Call in the Experts
Sometimes, DIY headlight restoration just isn't enough. If your headlights are severely damaged or you're not comfortable doing the work yourself, it's best to call in a professional. Here are a few signs that you might need professional help:
- Deep scratches or cracks in the headlight lens
- Yellowing or oxidation that is not removed by sanding and polishing
- Fogging or condensation inside the headlight lens
A professional detailer or auto body shop will have the tools and expertise to restore your headlights to their original condition. They may also be able to repair or replace damaged headlight lenses.
Maintenance Tips Keeping Your Headlights Clear
Once you've restored your headlights, it's important to maintain them to prevent future oxidation. Here are a few tips:
- Wash your headlights regularly with soap and water.
- Apply a UV protectant sealant every few months.
- Park your car in the shade or in a garage whenever possible.
- Avoid using harsh chemicals or abrasive cleaners on your headlights.
Safety First Headlight Visibility and Legal Requirements
Restoring your headlights isn't just about aesthetics; it's also about safety. Hazy headlights reduce your visibility at night, making it harder to see the road and other vehicles. This can increase your risk of accidents.
In many states, it's illegal to drive with headlights that are severely hazed or yellowed. Make sure to check your local laws and regulations to ensure that your headlights are in compliance.
So, there you have it! A comprehensive guide to headlight restoration. Whether you choose to tackle the job yourself or call in the professionals, taking care of your headlights is a crucial part of car maintenance and safety. Get those headlights shining brightly and enjoy safer nighttime driving!
:max_bytes(150000):strip_icc()/277019-baked-pork-chops-with-cream-of-mushroom-soup-DDMFS-beauty-4x3-BG-7505-5762b731cf30447d9cbbbbbf387beafa.jpg)